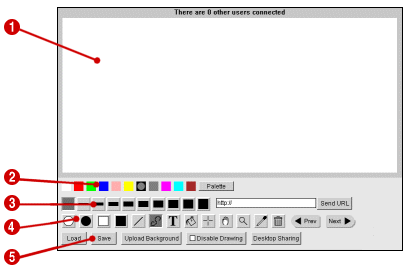

| The drawing canvas of the whiteboard. Hold the left mouse button down to draw onto the canvas. If other people are connected to the whiteboard, you will see them drawing in real-time. | |
| Click on the drawing colour you want to use. Palette - click to bring up an RGB colour palette window. | |
| Click on the size you want to use. This will be the pen size for lines and unfilled shapes, and the font size for drawing text. | |
| Click on a button to change the current drawing mode: Prev/Next (optional) - cycles through the png/jpeg images alphabetically. The Prev and Next buttons only appear if the presenter option has been set to true in the options file for the whiteboard. | |
| Click on a button to activate that function: Load - allows you to load a previously saved picture, or a jpeg/png background image. Save - allows you to save the current picture. If the filename you enter ends with ".jpg", ".jpeg" or ".png", the picture will be saved as a jpeg or png file. Otherwise it is saved in a custom vector format. Upload Document - allows you to upload a document (.doc, .xls, .ppt or .pdf) or image (.gif, .png, .jpg or .tiff). After uploading, you can load the document by using the Load button. Note that the Upload Document button is only displayed if you have upload permission. Voiceconf - click this button to begin a voice-over-ip conferencing session, allowing you to speak to the other users in the conference using your microphone (NOTE: it is recommended that all users have headsets). Disable Drawing - click this button to prevent any other users from drawing onto the whiteboard. Note that this button is only displayed if you have "disable interaction" permission. Desktop Sharing (optional) - clicking this button enables the desktop sharing function. Your computer desktop image will be sent to the other users in real-time, allowing you to demonstrate applications. The other users will just be able to view your desktop and your mouse pointer; they will not have any control over your desktop or your computer. The Desktop Sharing button only appears if the show_deskshare option has been set to true in the options file for the whiteboard. | |