Clear All - deletes the contents of all pages.
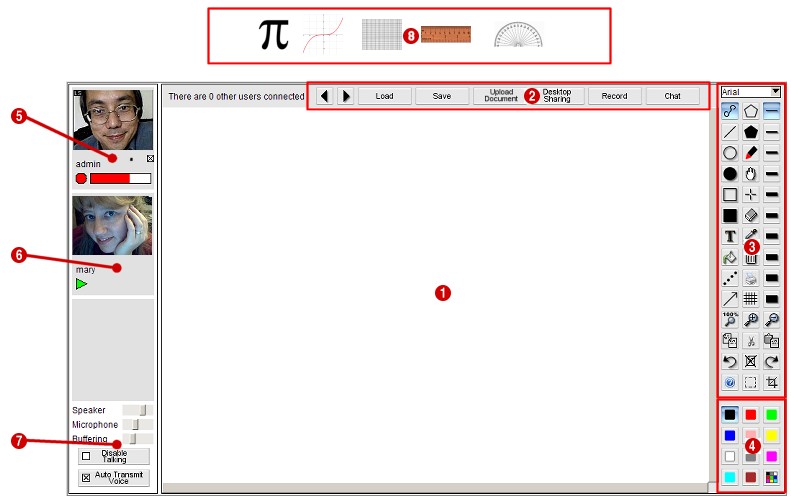
Load - allows you to load a previously saved picture, or a jpeg/png background image.
Save - allows you to save the current whiteboard state. You have the option of downloading all pages as a pdf file.
Upload Document - allows you to upload a document (.doc, .xls, .ppt or .pdf) or image (.gif, .png, .jpg or .tiff). After uploading, you can load the document by using the Load button. Note that the Upload Document button is only displayed if you have upload permission.
Disable Drawing - click this button to prevent any other users from drawing onto the whiteboard. Note that this button is only displayed if you have "disable interaction" permission, and the show_disable_drawing option is set. When you click this button, a window appears showing who can draw. You can click on a user's name to allow only that user to draw.
Desktop Sharing (optional) - clicking this button enables the desktop sharing function. Your computer desktop image (or optionally, one of the windows on your screen) will be sent to the other users in real-time, allowing you to demonstrate applications. The other users will be able to view your desktop and your mouse pointer. The Desktop Sharing button only appears if the show_deskshare option has been set to true in the options file for the whiteboard.
File Store (optional) - clicking this button brings up a file store, allowing you to upload and download files. This button only appears if the show_filestore option has been set to true in the options file for the whiteboard.
Icon Library (optional) - clicking this button brings up the icon library, allowing you to have a library of pre-set icons which can be placed on the whiteboard. This button only appears if the show_icons option has been set to true in the options file for the whiteboard.
Messages (optional) - clicking this button brings up a bulletin board, allowing you to read and post messages. This button only appears if the show_msgboard option has been set to true in the options file for the whiteboard.
Chat (optional) - clicking this button brings up a chat window, allowing you to chat to other users. This button only appears if the show_chat option has been set to true in the options file for the whiteboard.
Record (optional) - clicking this button starts recording the session. This button only appears if the show_record option has been set to true in the options file for the whiteboard.
Send URL (optional) - Type in a URL, then press the RETURN key or click the Send Url button to open up the web page on the other users' displays. The Send Url button only appears if the show_send_url option has been set to true in the options file for the whiteboard.
Poll (optional) - Allows you to ask a poll question to the other participants, and then view their answers in real-time.
Share Video (optional) - Allows you to share a youtube video with other participants.
Breakout Room (optional) - Allows you to create a breakout room, which you can invite other users into.
 - Use to draw using a highlighter tool. The highlighter tool is the same as the freehand tool, except that it is semi transparent.
 - Use to draw dotted lines.
 - Use to draw polygons. Click with the left mouse
button to place each vertex, then double-click to finish.
- Use to draw polygons. Click with the left mouse
button to place each vertex, then double-click to finish. - Use to draw filled polygons. Click with the left mouse
button to place each vertex, then double-click to finish.
- Use to draw filled polygons. Click with the left mouse
button to place each vertex, then double-click to finish. - Enters select mode, allowing you to select
an area of the whiteboard for copy/paste operations. You can also click
on objects to select them, and move them by dragging or using the cursor keys (use shift with cursor keys to move faster). Use +/- keys to increase/decrease the size of an item once it is selected (html5 version only).
- Enters select mode, allowing you to select
an area of the whiteboard for copy/paste operations. You can also click
on objects to select them, and move them by dragging or using the cursor keys (use shift with cursor keys to move faster). Use +/- keys to increase/decrease the size of an item once it is selected (html5 version only). - Click to cut the selected area and copy it to the
system clipboard.
- Click to cut the selected area and copy it to the
system clipboard. - Click to delete the selected area or objects.
 - Click to crop the image to the selected area.
 - Click to print the contents of the current whiteboard page.
 - Click to bring up the gridlines window, allowing
you to have a grid on top of the whiteboard and optional snap-to-grid.
- Click to bring up the gridlines window, allowing
you to have a grid on top of the whiteboard and optional snap-to-grid. - Brings up this window.


 - Click on the line thickness you want to use. This will be the pen size for lines and unfilled shapes, and the font size for drawing text.
 - Move the slider to the right to increase your headphones/loudspeaker volume
(the volume that you will hear other users speaking). Click the speaker icon to mute/unmute incoming audio.
- Move the slider to the right to increase your headphones/loudspeaker volume
(the volume that you will hear other users speaking). Click the speaker icon to mute/unmute incoming audio. - Move the slider to the right to increase your microphone
volume. Click the microphone icon to mute/unmute your microphone.
- Move the slider to the right to increase your microphone
volume. Click the microphone icon to mute/unmute your microphone.Disable Talking (optional) - Clicking on this button disables all other users from speaking. Only displayed if the user has disable interaction permissions.
Grant Presenter (optional) - Grants another user presenter status. This button is only available if the conference room has been set up in presenter mode, where only one user can talk/draw.
|
|
|
|
|
|
|
|
|
|
|
|